So as I've stated before I'm having
trouble balancing my wants with my needs, but it's okay and it's important for
me to remember that sometimes the kids needs outweighing mine is good! Just like when my 2yo came over with a paper bag on her head "hiding" while I was doing the dishes and she just wanted some attention. What did I do you might ask, well, I cut her some eye holes so she wouldn't bump into things and became the best mom for 5 minutes!! She was happy that I wasn't mad she was playing in something I hadn't had a chance to put up and I was happy that she had something to keep her busy so I could attempt to finish something!
 Nap-time is a blessing for us Moms who still get to have that time and I spent one said blessing of a nap mending dress up clothes and my older
daughters clothes. Not really something for me, but it needed to be done and while I'm glad that the 7 year old knows I can fix
things so to not get to upset, it's sometimes a curse when her pile of things
to be fixed consumes my sewing table.
Nap-time is a blessing for us Moms who still get to have that time and I spent one said blessing of a nap mending dress up clothes and my older
daughters clothes. Not really something for me, but it needed to be done and while I'm glad that the 7 year old knows I can fix
things so to not get to upset, it's sometimes a curse when her pile of things
to be fixed consumes my sewing table.
So 4 skirts, one dress-up dress and
a night gown later and their items were all fixed. It was a heap of crazy
colors too as you can see! Oh and one Barbie bikini top that needed new
ribbon! (why yes, I am a seamstress for all sizes it seems) Thankfully the toughest task for these was putting new elastic on the yellow skirt, otherwise it was mending holes and repairing seams.
This allowed me to free up a huge
space on my table and I got to hem some jeans that are just WAY to long for me
which is crazy! It's crazy because I'm 5ft 9in on a good day and pants are
always to short in my opinion. So it's very surprising that pants are just to
long, but yup even with the tallest heals I own these great fitting jeans were
still to long!
It really was easy to accomplish and
the tutorial was great. I have a few tips that I'd like to share if you want to hem your own pants! They are just some things I found
helpful that weren't in as much detail or weren't on the tutorial that I had done differently. The tutorial was great though, so I'm not typing out how to hem your pants just the extras I did with mine!
My tips for hemming jeans:
- Make sure you try on your jeans and cuff them over to where you want the bottom of the pants to fall. Then either just measure them while they are on or pin one leg so that you don't lose your amount you want to adjust them too when you take them off.
- Once you've measured the amount you want off divide it in 2 like stated, I know it sounds weird, but it really does make sense because if you sew it as it lays after trying on your essentially taking off double the amount of length! Just think about the fact that your taking fabric from the front and back of where the fold is!! For me I needed to take off 2 1/2 inches from my length so I measured 1 1/4 inches and that's where I put the fold. I did just as she said and measured just under the existing hem line. When you get all the way done and cut off the fabric it should be just under the original measurement you took that's cut off. (photo 1 below show's what I cut off)
- I used a zipper foot to sew down the seam next to the original hem, it helps you get super close to the edge of the hem! (photo 2)
- I HIGHLY recommend that after you sew down the fabric next to the original hem you try them on and if they fit leave the jeans right side out and sew a nice topstitch just to the left of the original hem. You can see where the fabric is folded on your jeans from the top, just make sure it's all laying nicely with the folded fabric laying flat. (the fold in the pants leg will be going toward the top of your jeans, so when you topstitch you are sewing through 3 layers 1. the actual jeans and 2&3 are the folded pants length your going to cut away. (photo 3 shows finished topstitching)
- Topstitch before you cut away the extra material it makes things much easier. I topstitched both legs and then flipped my jeans inside out and cut the extra material off right along my topstitching line. If you have a super dark navy thread and dark jeans you won't hardly see this sewing once it's done, but as others said in her comments it will help keep things from turning after you start washing and wearing your newly hemmed pants! (photo 4 & 5 show before and after cutting the fabric off after topstitching)
There you have it, my extra tips for
those interested!!! I'm also including some pictures below to help you
see what I was talking about :)
 |
| Photo 1: this is amount I cut off after sewing almost 2 inches cut off and I needed 2 1/2, so this is perfect because the rest is in the seam allowances from sewing! |
 |
| Photo 2: my machine has a zipper foot that has to be moved from left to right, but you can see how close the needle can get to original hem without sewing on it! |
 |
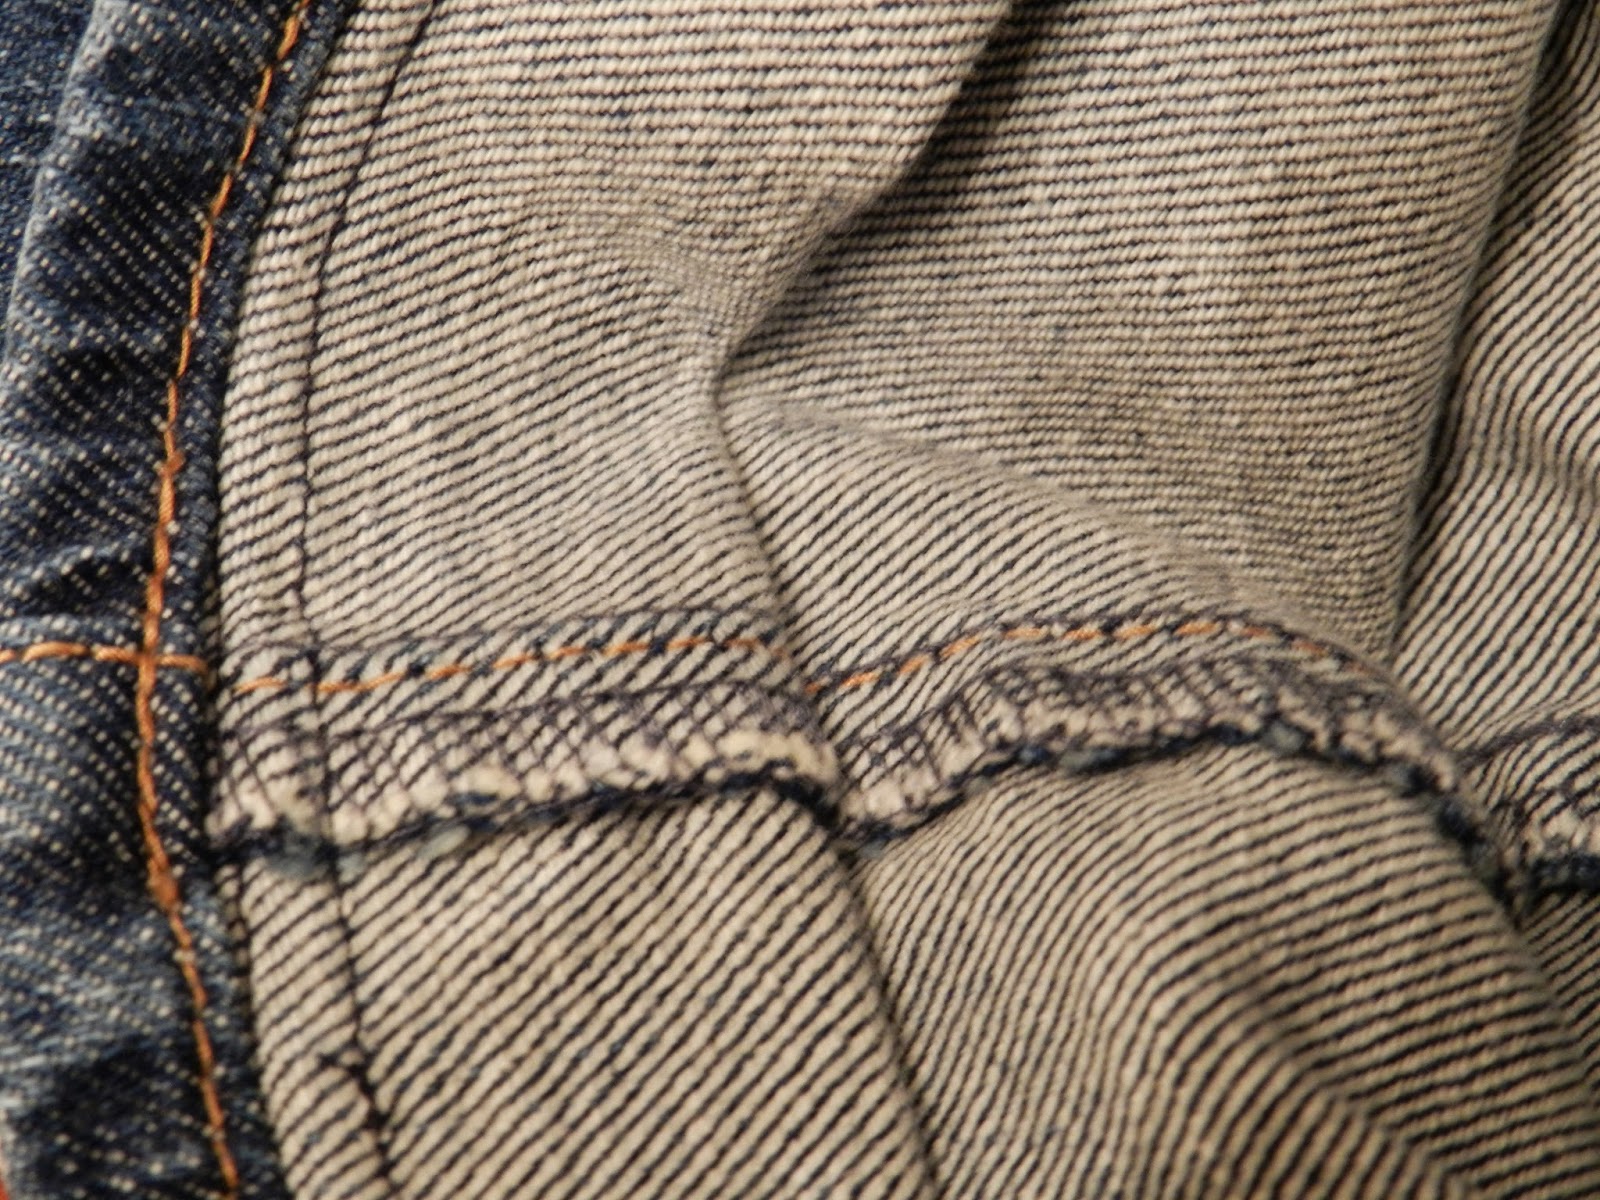
| Photo 3: you can just barely see the topstitching that I did in this close up! |
 |
| Photo 4: before I cut extra fabric off, you can see the folded edge towards the right and where the topstitching is that I did |
 |
| Photo 5: here's the finished new hem top shows how it looks on outside bottom is the inside after cutting extra fabric! |