Thursday, September 27, 2018
What’s your Motivation?
Monday, September 10, 2018
Trying to blog again.....
Saturday, October 1, 2016
Netflix and chill?????
Now after 3 days of getting to watch Netflix cartoons and movies she's officially addicted and wanted to stay home from school and "chill" rather then go back to the normal. She loved watching Care Bears, Popples, The Boxtrolls and I have no idea what else. It definitely was a nice change from the normal cartoons we watch and good for her to get a wider variety of TV time.
Friday, July 29, 2016
Best tip ever....... To save a stuffed toy from having band-aid stuck to it!
Thursday, July 21, 2016
Oops.....haven't posted in way to long!
Monday, May 23, 2016
That is not what I was "expecting"...
Tuesday, March 15, 2016
Honesty on social media
Sunday, March 6, 2016
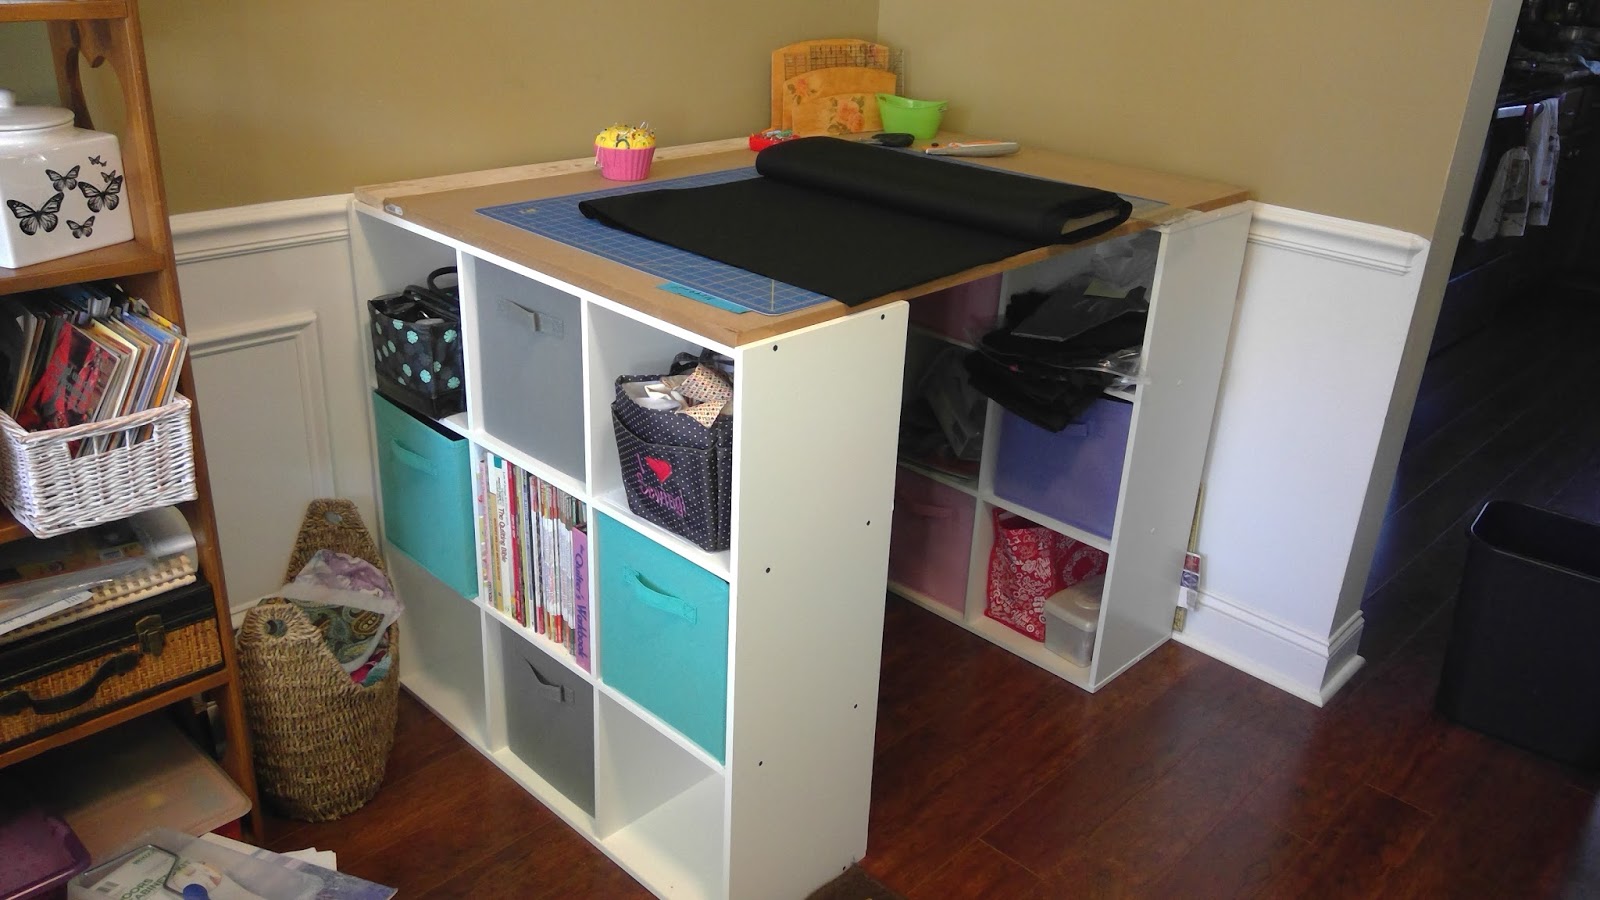
New Cutting and Storage Table
I had seen this blog post about making a custom table using storage cubbies and MDF and knew that would be a solution to one of my problems. I needed a more stable and larger space for cutting fabrics and since I tend to have OCD when it comes to things being organized so using cubbies is a bonus I wouldn't argue with.
I wish I had taken a before picture, but I didn't so you will have to use your imagination and picture a small card table propped up on those under bed raiser things. You know the plastic squares that help give more height to a bed, yeah I used those to give height to my card table. The biggest problem with this was the lack of cutting space because my mat was bigger then the card table so I couldn't use the whole thing to cut. And I had no extra space to spread out on if I had bigger pieces of fabric. Oh and it was a little wobbly, so yeah, lots of issues with my cutting space!!!
In came the idea from the post and I had just so happened to switch out my daughters cubbies for a bin organizer so I only needed one more cubby organizer. I had MDF on hand leftover from another project that happened to be close to the right size so I went out and bought another cubby organizer and got to work.
First I had to rearrange my room to fit my new table, so my house looked like "a training obstacle from American Ninja Warrior" according to my hubby.
The sewing room looked pretty clean as you can see in the back ground, but the rest of the downstairs surrounding it was a giant mess!!!
In came the fitting my new table into the sewing room. I didn't need a big corner desk like the post had and frankly I didn't have the room in what is supposed to be our formal dining room for that, so I improvised. I wanted to use MDF I had left over and it measured 49 inches by 31 inches, the tops of the cubbies measure 36 inches long so my MDF ended up being a bit shorter. No big deal I'll show you what I did to make it work!
So once I rearranged the two desks I had in the room already and had turned the downstairs into the training course I assembled the new cubby organizer. Then I put it and the other one in their new space and measured from the outer edges of each to make sure that they were spaced for the MDF to go right on top.
![]() |
| MDF in place pushed all the way to wall to start |
![]() |
| side view of just MDF in place |
I put the 1 by 2 butted against the cubbies on the inside so that the MDF stayed flush with the outside edges, so you won't see the rails when looking at the table unless you crawl underneath. By the way I also had the 1 by 2's on hand from a different project and two that happened to be the same length, I want to say that our rails were about 12 inches long.
![]() |
| underside of the top with rails in place |
![]() |
| here's a side view of how the rail is butted against the cubbies |
![]() |
| one more view of my 1 by 2 in place |
![]() |
| My 1 by 4 in place at the back of the MDF |
All in all I'm super happy with my project. If you don't already have your wood on hand I would definitely recommend getting the MDF made to the size of the top of the cubbies and the length you need it. I just wanted to work with what I had though to save money. Especially since hubby thought I was crazy when I said that I really was planning to do this. I love my new table though and haven't had a chance to paint because I had a sewing request come in that I need to use the table for now. As soon as I'm done with the project though I will paint the top and extra piece of wood and can update the post with a pic.
![]() |
| Here's my awesome new cutting table! (minus the white paint still needed) |
My pretty white table completed!!!
Tuesday, March 1, 2016
Replace your excuses with fresh determination
I've driven past the same sign at the same church for months now. I seriously think they wrote the phrase on there after Christmas and never took it down. I'll have to take a picture as I drive by, but it's gone from wow that's motivational to man I should really freaking wake up and listen to it!!!
"Replace your excuses with fresh determination."
Read it and then read it like 60 more times!!! It really starts to stick after you read it a few times and then BAM it hits you. It's like a big "hello" greeting you saying to stop making excuses and start doing stuff!!!
So I write this in hopes that it does the same for someone else!
What am I being motivated to do, well, a lot actually. I'm considering becoming a realtor, working on a big sewing project for my husbands cousin, trying to blog more then once a month, start some quilts, and the list could go on. One thing I have been wanting to do since I saw this blog post is to make myself a cutting table for my sewing area. So after redoing my youngest daughters toy storage I had an extra cube organizer and I got started cleaning and deciding a new layout. My downstairs is now an obstacle course, but I have the starts of a new table and just have to find where everything will go. I'll do a post about my redo very soon.
Motivation may not always be there when you have kids taking over your life, but remember you need to take care of you too! So please "replace your excuses wth fresh determination" and you will succeed!
Thursday, February 18, 2016
Star Wars fever
My girls and their dad are OBSESSED with Star Wars and the fever really striked the house when the new Force Awakens came out. My kids wanted to go see it with their dad, but he wanted them to see the originals first. So we spent two weekends watching all the original Star Wars. (by original I mean 4-6, because I'm told those are the only ones that count, lol)
That's when the fever hit my kids hard!!! They've all become obsessed and every time they see anything with Star Wars it gets pointed out.
My oldest decided she wanted to check out books at the local library (amazing what you can find at the local library, I'm just saying) and can you guess what she checked out?!? Yup Star Wars!!! One of the books was a craft book so I was tasked with making most of the items both kids wanted. Thankfully most of the stuff that I needed to create these crafts you can find at the local dollar store!
These are their Millennium Falcons and I also had to make the little girly a special belt.
The final project came from another blogger and was an awesome Valentines craft I made for my oldest to take for their exchange. Forgive the mess surrounding them, but I immediately bagged them for her to take to school so just snapped the pic as soon as they were completed messy scraps from creating them and all :)
The kids also want light sabers, but we need either paper towel tubes or gift wrap tubes and I don't have any on hand yet. Oh and to make paper plate Yoda's that they saw in the craft book, those are part of weekend plans I think. So I hope the "crafting force" will be with you all and you create some fun things for/with your kids!
Tuesday, February 16, 2016
Anniversary fun
Sunday, February 14, 2016
Lent
In the Catholic church that I attend they highly encourage attendance to the Ash Wednesday Mass to help symbolize the beginning of Lent and get you spiritually prepared for the Lentil season. I signed my oldest out of school so that we could go to Mass and then take the rest of the day to talk about our sacrifices we planned to make for Lent. This year is the first year my 8 year old really understood that we give up something we love during this time as a personal sacrifice, but she really wanted to give up something also. It's great that in her Sunday school teachings she's learned about this and understands that this is our way of sacrificing something we love just like Jesus fasted for 40 days leading up to Easter.
My daughter decided to give up playing her DS which to her is a very special possession that we truly limit her time allowed on it. While I tend to give up Facebook as this is something that I enjoy wasting to much time reading every day. (It really is scary how many times I would check FB to see updates from friends and the random pages/groups I like). I do get my messages from there so if someone was to reach out to me I would know, but otherwise I don't spend that time I used to on there. My daughter and I have also talked about doing things for others during this time and we've already donated some items to a local family who lost everything in a tornado that happened a little over a week ago.
I'm hoping that we grow as a family during this time of Lent as we will definitely be spending more time together with fewer distractions from the things we have chosen to give up! I hope that any of you reading this that celebrate Lent will also think about not only giving up something, but also doing an act of charity during this time!
Tuesday, February 2, 2016
Valentines
So I think my hubby may be buttering me up so I get him something awesome for Valentines, because I told him I bought some new make up from one company only to be told about a great deal from another company selling just around the corner from the first. I was tempted, but instead told my husband about the deal with some ;) winky faces ;) to hint that I might want it too. He texted back with "you don't need a bunch of makeup tho....you're pretty without it!:)" His exact words from my text!!!
Well, guess this girl is gonna hit up her favorite shopping site Amazon in order to find something good and get it delivered in time for the big holiday! If you don't have their Amazon Prime Account you are missing out, because they offer FREE two day shipping on so much stuff! Works great for those last minute shoppers and for items you may want right away!
I'm not quite sure what I plan to get him, but I did find a magnet that fit my husband perfectly! :)
Saturday, January 9, 2016
mommy life
You know what though? I LOVE being a SAHM too! I didn't think that I would at first I honestly couldn't picture my life as "just a mom" and still there are days I wonder if it's right for me. I think we all do! We all start feel like our kids are our life and that we don't have a life of our own. In a way it's true, at least for me. My life really does revolve around my kids and their schedules and most of my friends now are other moms who's kids are in my daughters class, or for my youngest kid close to her age that I've met the mom too. We both needed adult conversations, so we have playdates to let the littles play while we can have a conversation using "big words" and not "baby talk".
I have a few friends that like to remind me I'm not "just a mom" and I love them for that, but most days I do feel like mom is my title and life and there's not much else to it. Other days though, I'm sewing or typing or talking to an adult and I feel like I'm a separate entity from my kids and that's nice too. I'm dreading the next school year in a way because my youngest is going to start pre-k which means I will have 6.5 hours Monday through Friday where it's just ME! What the heck am I supposed to do with that much time? every day of the week?????
Honestly, I can think of a ton of stuff that I can do with that time and I'm sure I'll accomplish a lot more sewing during those hours, but I'll also miss my little one running around. I'll also miss her asking me to "just cuddle me all day" while we watch a movie together! Yeah, that one happened yesterday! I said awe of course I'll cuddle, but it only lasted maybe 30 minutes. It's times like this that make that baby fever kick back in!!! Then I will have more mommy duties to take care of all day and no time to think about having 2 kids in school. Hubbies not on board with that idea though he thinks 2 girls is enough, so I guess I'll be filling the hours with sewing, maybe some cleaning and who knows what else. I've even thought about getting a job again, but yeah it's way to early to decide if that's going to happen or if I want it to happen.
For now I will enjoy the last few months of one on one time I get with my youngest while her sister is in school and we will have a fun summer before she starts her first year of school!!!
Friday, January 8, 2016
New Year.....New Goals!
I don't ever give myself a weight goal to hit, because honestly I've weighed about the same since I had my second kid 3 years ago. I have fluctuated and did lose a good bit of baby fat, but never did much to help drop the weight. Who really has time with two kids?!?!? Well, really that's no excuse I've decided. You have to make time if you want to make a change! Over the summer I was sent a link to a mom who does work outs in her home and had lost 100 pounds IN HER HOME! Yes, it takes proper diet also, because eating leftover chicken nuggets and pizza isn't good for you if you want to drop a few pounds. Sad I know!!!! Anyways, back to the work outs, I was told about this work out challenge that was being done and one was starting up for summer. So I took the challenge! 90 days of work-outs, what the heck was I thinking committing myself to that?!?!?
Well, 90 days is a long freaking time in the summer when both kids are at home and your trying to work out. It's also long when you have a two week road trip planned!!! So I probably did more like 75 days even though I did extend past when the challenge ended since I skipped about all of the two weeks we were gone. I picked it back up when we went home :) To hard for me to work out on the road especially when internet wasn't always available.
You know what happened during that time.....I DIDN'T LOSE ANY WEIGHT!!!! That's right NONE, however, I did slim down in areas and get muscles as big as mountains if you asked my oldest! This is why focusing on weight can't always happen! I got so upset that I pushed myself so hard while doing the work outs and I ate a little better, but lost nothing!!! Such a disappointment to my ego I'd say, but I took pictures and compared them and could tell I did get more toned in my arms and legs and slimmed down in areas.
So where am I going with this? Oh yeah, new year goals! My goal now is to focus on another 90 day work out challenge and not stress about the number on the scale! It matters to everyone in their own minds and ways, but who really knows that number besides you? Well, your doctor and maybe your significant other and that's it. What people will notice is you slimming down and toning up and guess what else? Muscle weighs MORE then fat!!!! Yup, that's right, the thing you want most is muscles and toned arms and legs and those things add weight to the scale! So rather then focusing on a number I'm going to focus on how clothes fit me and how toned and strong my body is becoming!
I really do feel better when I get in a work out and I am doing them from home. There's tons of free videos on YouTube of work out's you can do in your living room. I literally only use hand weights and a chair in my living room to work out and get fitter. My husband has told me he doesn't like taking measurements for me anymore because my calves put his to shame and my thighs are like rocks so there's no need to measure them anymore. I just laughed and asked how I'm supposed to track changes, his response was to just take the before and after photos since those were what truly show the difference!
Still thinking you don't have time, trust me you do! The kids want to watch TV forever anyways, so why not take your tablet to another room and load up a video and get to work! I've done that before, but I like putting the videos up on my TV through the Blu-ray player. So I let the kids work out with me which sometimes means lots of stopping, or they eventually go play in their room, but I get the work out done and I feel much better about myself after that. I promise it can be done and you don't have to go torture yourself with the gym and daycares if you don't really want to. I did love going to the gym back in the day, but options here are limited and daycares in gyms are only certain hours or not available at some gyms. So this works great for me, but even a walk around the block could help, so just make the time and do this one thing for YOU!!!!
A Halloween post I totally forgot to hit publish on, ooppssss
Friday, October 30, 2015
Pajama Day.....almost all week!
It's really funny when your husband questions if your youngest even got dressed during the week. Now let me explain, she's 3 and very persistent so if we don't need to go anywhere except the bus stop I'm not going to pressure her to get dressed.
This past week was spent doing lots of ironing, cutting and sewing! We only had to leave the house for things on Monday and Wednesday. So I took full advantage of that and spent the other three days at home working on projects!! It was a change from the week before because I had my mom in town the week before and I didn't get much of anything done that week.
It was a good week and I got several things finished and more laid out and started. It's a good thing too as I signed up to set up a table at a local winter festival in order to try and sell items I've made. Which is great and a good way to get my skills noticed more, but you need products made in order to sell!! Kind of an important part of the process I think! Thankfully, baby girl is happy to play and color and watch some TV while her sister is at school and as long as I feed her occasionally she lets me work.
So if she wants to insist on staying in her pjs all day and "having a pajama day" as she calls it I'm fine with that!!! We do what works and that's what makes her happy since she thinks it makes her special to not get dressed!!
Monday, September 28, 2015
Quilt binding tip and useful tool
When making your own binding be sure to cut the strips on the bias so that they have a stretch to them and makes it easier to wrap around your project and to fold corners. I will make a post about how I cut my fabric to make bias strips another day I promise!!! One really cool thing about cutting fabric on the bias is if you are using a striped fabric it will put the stripes on the diagonal giving you a cool candy cane affect if that makes sense. I wish I had a picture on hand of what I mean, but of course I don't so I will try to find a stripe to do the tutorial on when I do it, so you see what I mean.
Okay, so onto why I really wanted to make this post. I was given a Quilt Binding Express by my awesome mom and finally got the chance to use it not that long ago when I finished a quilt that had been sitting in my to do box forever. Well, I had seen this odd pressing board and wondered if it would really help speed along the binding making process and IT DID!!!! While I love making my own binding it gets to be tedious when your pressing close to 200 inches of fabric in half to make your binding. This nifty tool helped by folding the fabric in half for me and I just had to press it down as I pulled it through the slot.
In case your lost as to what on earth I'm talking about I'm going to post a few pictures of what I did and how the tool worked!
So here's the tool set up with all the normal ironing tools and my binding strip. As you can see you pull your strip through from right to left and then press on the little board that's attached. It has 3 slots for your binding strips too, so you can use this for 2 1/4, 2 1/2 and 2 inch binding strips. You simply fold your strip in half with wrong sides together and start pulling through the slot marked at what size strip your using. Then you just pull to the end of the pressing mat attached and press the strip while its all lined up on the mat.
Here's a close up of my strip coming through the slot. One thing you do have to watch for is your strip getting out of alignment. If you pull somewhat slowly your strip will come through the slot exactly even with itself, but if you get to moving to quickly it will get a little out of whack like the picture shows here. It takes a simple pull of the fabric to straighten it back out and get going again though. For the most part I didn't have to readjust my fabric to much and I got through my pile of binding pretty quick with the tool. So totally worth picking up a Quilt Binding Express in my opinion as it does save time and a lot of the headache involved when making your own strips!
Here's a picture of my binding attached to the quilt I made it for. I have to admit in my rush to get things done I didn't cut the fabric on the bias the right way and so the binding strips have the flowers in the same direction as the border strip at the edge of my quilt. This wouldn't have happened this way had I cut things right as the binding would have made the flowers be at an angle, but we all make mistakes and I didn't have the extra fabric to start over. This quilt went to my daughter who is 3 and doesn't care anyways, she's just happy to get the blankey from me!
Anyways, I wanted to show you this picture more because you can see a different way to finish off attaching your binding. Instead of attaching my binding to the front and bringing it to the back of the fabric I did the reverse. Then when I pulled the fabric to the front to sew down using my machine I picked a fun decorative stitch to sew it down. You can see that on this picture instead of just using a straight line to sew down the binding I picked a stitch that does little slanted lines going both ways and has a straight stitch down the middle. So I tried to keep the straight stitch close to the original sewing line I made when sewing my binding onto the back and let the slants go onto the binding and into the border fabric. If you were to see the back of the quilt some spots I did better then others keeping things lined up, but from the front almost all of it I kept things lined up pretty good. This took the stress out of making sure I lined things up right on the back of the quilt so that the front looked good since I worked on the front to finish the quilt. You could even just do a straight line stitch to sew it down, but sew on the front if you wanted to. I just liked the idea of using a decorative stitch that I wouldn't normally use on my machine!
Have fun with your binding if for no other reason to give yourself a desire to get it done. I know getting a binding onto a quilt sometimes is the worst part for some people, but if you add fun touches to it then it's more exciting to complete!
Wednesday, September 23, 2015
Traditional Fleece Tie Blanket DIY
Tradition Fleece Tie Blanket instructions
Materials:
- 1-1 1/2 yards of fleece in two colors or a print and a color- I used 1 1/2 for my 3year old, but for a smaller child 1 yard would be plenty.
- Good scissors or a rotary cutter and mat
- Ruler
Instructions:
So a traditional Tie Blanket is pretty easy! Simply take your two pieces of fleece and lay them with wrong sides together, smooth out all the wrinkles and then straighten up all your edges. You'll also want to cut off the selvage edges from the longer sides. Don't worry to much about getting an even line because you won't be able to tell when your done anyways. The big thing is to not have it to far off, but with all the edges even.Then you will cut out a corner that is 4 inches by 4 inches like you see in the picture below. Just discard those squares or give them to your little one to use for their dolls!
Now you will cut strips in the fabric that are 4 inches long by an inch to an inch and a half wide. I am for an inch, but usually end up cutting them slightly wider. If you use a rotary cutter and a mat it's a little easier to keep this neat and close to the right size. With scissors I like to lay my measuring tape on top of the fabric to do the measuring. Below you can see where I actually did a combination of measuring tape and mat, but I don't recommend using a metal measuring tape like I did! I totally ruined a new blade because I kept accidentally running into the metal tape and it nicked my blade :(
Once you cut all your strips all the way around you simple take one pair of strips, a top and a bottom strip, and you tie them together. I like to double knot them to make sure they aren't going anywhere! Make sure on the edges that feel a bit stretchier (not sure that's a word lol) that you don't tie them as tight or pull as tight because it will distort the fabric a little. No one will notice though so don't worry if your a bit more aggressive in your knot tying. I also like to watch how I pull my knots so that way the solid fabric I chose shows on the top and the printed strips are at the bottom. Check out my picture below you'll see what I mean!
| I chose a lavender for my solid bottom fabric and when I tied my knots I just made sure to pull that towards the top layer so it's visible from the top and adds a nice accent to the blanket. |
Once you tie all the way around your blanket you are done!!! Then it's ready for your little one to snuggle underneath, or they make a great gift too! If you want to try a different take on the fleece blanket check out my post on the Braided Fleece Blanket!
| My little one being silly snuggling under her blanket! Love me some little piggies!!! |
****update: if you wanted to make a baby or toddler sized tie blanket, you could use 1 yard and cut that in half, so you'd have 36 inches by about 29 inches and can make two out of the yard. You would cut 3inch fringe instead of 4 since it's a smaller blanket, so you'd also cut a 3x3 square out of the corners! This is a good size for them to have a lovey as some people like to call it and they can be covered by it or just snuggle it, but it's a better size to be totted around with them!
Braided or Crocheted Fleece Blanket DIY
Well, I can't buy fabric for one kid and not the other, so for my almost 8 year old I bought 2 yards of fleece in one print and one solid and bought 1 1/2 for my 3 year old. The post I found was to make a crocheted/braided edge on the fleece blanket as opposed to the traditional ties most people do. Still a no-sew technique which is good with how bulky fleece can be, but a much different outcome!
| Braided edge on my daughter's fleece blanket! |
So just like in a traditional tie blanket your going to cut out a square from all four corners of your fleece. First, of course lay out both pieces of fleece with the wrong sides together, so you have a right side touching the floor and one facing the ceiling. Then you will cut 2 inch by 2 inch squares out of all the corners, cutting through both pieces of fleece. After that's done you will then cut your strips just like with a tie blanket, but shorter, so these will be 2 inches long by 1-1 1/2 inches wide. Doesn't have to be perfect though you do want them as close to the same as you can.
| You can see none of my cuts are perfect, but in the end it really doesn't matter! |
| If using scissors to cut slits get a good heavy duty pair like these. |
| This is how I made slits in first blanket by folding strip then cutting it down the middle. |
| Using a rotary cutter for both cutting my strips and slits made things go a little bit faster and made for neater slits! |
Once all the slits are cut you will then start on the blanket working in reverse from where you started. So start on the last slit you cut, assuming you just went around the blanket after skipping the first two. If not just start at the corner next to you two strips that aren't cut and you will take both bottom and top strips and bring the next cut strip through the slit in the one you picked up. You will do this all the way around your blanket until you reach the two strips you didn't cut. When you get there take the first strip without a slit through the last strip with slits and then you tie the last none cut strips to the one you just pulled through. This knots the whole thing together holding all your work in place. I personally double knotted the strips best I could to try and make certain it all stays together!
Sorry I didn't take any pictures of these last steps, but the are shown on the original post that I found!
After tying your knots though you are done and have a super cute fleece blanket to snuggle under!
| top view of my daughters blanket |
| Side view of the braided blanket! This has been washed several times and still looks good, no braids coming undone or anything crazy! |